Written by Robert Robillard and published on https://www.aconcordcarpenter.com/
Whether you’re an experienced gardener or a beginner gardener, one thing most of us can agree on is low maintenance is best. No one really wants to battle weeds endlessly or fight packed soil. I’ve battled both weeds and soil, but since we started raised bed gardening, those problems are all in the past.
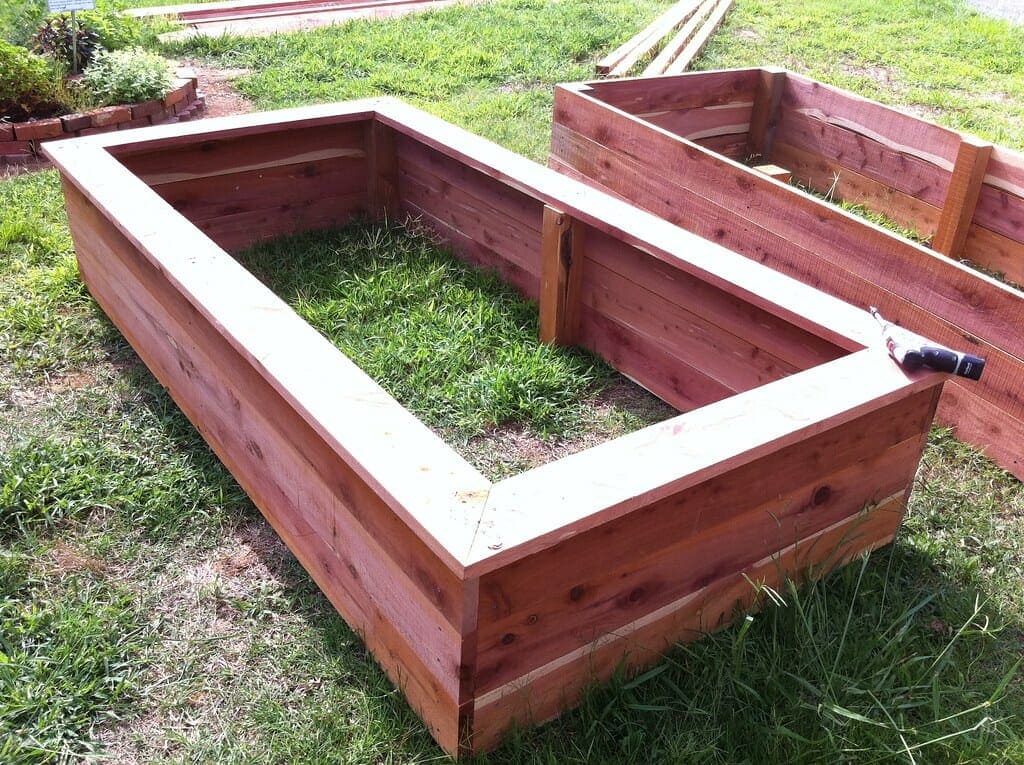
Building a cedar raised garden bed is an easy afternoon project that can take you from nothing to complete garden in no time. Check out these easy instructions to how to build a cedar raised garden bed!
Building a Cedar Raised Garden Bed
How To Build A Raised Garden Planter
Building a Cedar Raised Garden Bed is a great way to grow healthy plants, herbs, and vegetables. A raised garden bed is a large planting container that sits aboveground and is filled with soil and plants. There are many benefits for raised bed gardening, such as;
- Perfect for growing vegetables, herbs, and flowers on patios, porches, decks, and balconies
- Allows you to garden without bending over or kneeling.
- Plant productivity of plants increases due to better drainage and deeper rooting.
- Raised beds allow for better soil quality and content in a nutrient-poor or weed-riddled area.
- Can allow for a longer growing season.
- Fewer weeds grow in an elevated garden.
- An elevated bed can make it harder for rabbits to eat your plants.
Which Species of Wood Should I Use to Build My Bed?
The better-looking raised garden bed is usually made from cedar. Although it can be expensive, cedar is more durable than other woods due to natural oils that prevent insect infestation and rot. The planter is best left unfinished – there’s no need for stains or paint.
You can also use the pressure-treated lumber sold today which is certified as safe for organic growing. You definitely want to avoid using anything soaked in creosote, such as railroad ties.
If you use fasteners on your raised bed make sure you choose galvanized or stainless steel. Both types of fasteners are rust resistant.
What’s the Best Size for a Raised Bed?
There is no perfect size. It’s best to build your raised bed to fit its location. A common width of 4-feet allows you to use 8-foot lumber and get the most of your material. Garden plants need 6 to 12 inches for their roots, 12 inches is ideal. Keep in mind that you can also build multiple raised beds for different plants. Just remember that although you can make it any length, making the bed too wide will make it difficult for the gardener to reach the middle.
Here are the dimensions for the one I made:
- Overall Dimensions 32” H x 22.5” W x 38.5” D
- Height – Top to Bottom32” [internal]
- Width – Side to Side 21” [internal]
- Depth – Front to Back 37”[internal]
Where to Locate Your Raised Garden Bed
Adequate sun is essential for growing most plants. Look for a spot that gets a minimum of 6 to 8 hours of direct sunlight per day. Choose a level location so that the bed doesn’t tilt or slope, which can affect the drainage of your raised bed. Position it close to a hose spigot so you can easily water your plants – soil in raised beds dries out faster than ground soil, so it’s important to keep up on the watering.
Ideally, you’ll also place the bed where it can be easily seen and appreciated from inside your house. If you’re growing herbs or vegetables, perhaps you’ll want to site it close to the kitchen door for easy access.
Materials Needed
- 4” x 4” posts
- 4 post caps – protects post end grain from absorbing moisture, premature rotting.
- 1×8 Cedar boards for sides and bottom
- Rust resistant fasteners
Building the Raised Garden Bed
I choose to use 1×8 cedar to build my raised garden bed. Using thicker boards would make the bed heavier and more durable, but also more costly.
I decided that I wanted to experiment with minimal fasteners so I cut slots into the 4×4 leg posts to accept the side boards. The best way to do this is with a dovetail joint. A dovetail joint is a joinery technique most commonly used in woodworking joinery. It used no fasteners, and is known for its resistance to being pulled apart.
Cutting the Raised Garden bed
I decided on a leg height, using a miter saw I cut all 4 posts to 31” high. At this height I can get 3 legs out of one 96” long post. My lumberyard stocks 8-foot 4x4s.
Leg and Side Connection – Dovetail Slots
I used a router and dovetail bit to cut slots into two sides of each 4×4 leg post. My design called for post caps so I cut the slot ½” longer than the side material. This allowed me room to later mount the cap and keep it from touching the side boards.
Cutting the Raised Garden Bed Side Panels
I wanted to achieve an internal width [Side to Side] of 15.75”so I added and doubled the depth of my dovetail slot [X2] to that measurement and cut the boards on a miter saw.
The internal depth [Front to Back] of the beds was going to be 31.75”. I did the same procedure of doubling the depth of the slot and adding it to the length of the board.
Note – these boards will receive a dovetail on the ends and eventually slide down into the 4×4 post slot. Adding the depth the slots are needed to achieve this.
Assembling the Side to the Posts
I slid the side panels into the 4×4 post legs. I used a sanding block to ease the dovetails on the side pieces to allow them to slide into the slot better.
Building the Bottom of the Raided Garden Bed
The raised garden bed panels help hold the entire structure together. I decided that the bottom of the bed would have 1×8 cedar boards, spaced ¾” apart for drainage. We’d line the inside of the bed with landscape fabric to keep the soil inside the bed.
To secure the bottom boards I added a 1-1/2” wide ribbon strip along the bottom perimeter of the garden bet. I used plenty of 1-1/4” screws to secure it to the side panels. This ribbon strip supports the 1×8 bottom boards.
Tip: Cedar splits easy. Make sure to pretrial any screw holes.
The bottom boards are then fastened to the ribbon strip with 1-1/4” rust resistant screws.
Building and Mounting the Post Caps
I used some 2×6 cedar to make the post caps. I cut the caps on my miter and table saw so they overlapped the post 3/4” on all four sides. Once I had the caps cut to size, I used my table saw to rip a bevel on all four sided of the cap top. The bevel adds a nice aesthetic feature and also serves to shed water.
I secured the post caps with construction adhesive and allowed it to dry. Afterwards I will add long 16- penny galvanized finish nails or screw the caps down and hide the screw heads with plugs.
Lining the Bottom of the Garden Bed
To keep the soil from falling through the ¾” drainage slots I added landscape fabric to the bottom of the bed. I cut the fabric a few inches longer on all sides, and added a few staples to hold it in place until soil is added.
Soil for Raised Garden Beds
The soil blend that you put into your raised bed is the “secret sauce,” to its success. Fill the beds with a mix of topsoil, compost, and other organic material, such as manure, to give your plants a nutrient-rich environment.
Ready to Plant
Once the raised garden bed planters were finished and filled, it was time to start planting!
Original post here https://www.aconcordcarpenter.com/raised-garden-bed.html/.


